How to grow an Alocasia from a Bulb
It is no surprise that my favorite plant is the Alocasia Frydek. In my opinion, Frydek’s are perfect for plant parents who want to elevate their plant collection. One thing that i’ve learned by being active in the plant community is that alocasias are very intimidating, which is very understandable. If you’re unfamiliar with alocasias and why so many people try to stay away from them, you should note that without proper preventative care, alocasias are very prone to spider mites. One of the first indications that you will see when your alocasia has spider mites is how quickly the leaves begin to yellow/spot, and die off. If you don’t catch spider mites early on, it’s a hassle getting rid of them if you’re unaware of how to do so. Unfortunately, when my alocasia frydek had spider mites, I didn’t catch them fast enough and grew to become very annoyed and frustrated so I tossed the plant (don’t judge me). Prior to me tossing the plant, I made sure to check the soil and roots for any bulbs/corns/seeds.

When digging in the soil for the bulbs, this is what you should be looking for. They are very tiny and appear to look like food. Again, remember, gently remove from the roots. Once you have successfully removed the bulbs from the roots/soil, you will need to gently press on each seed to ensure they are firm to touch. If they are soft to touch, you will want to toss them as they will more than likely rot.
So what do you do after locating these bulbs? You determine how you want to germinate your seeds. There are various methods you can use to germinate so it honestly depends on what you prefer. I’ve tried 3 different methods and will go into detail on what worked, what didn’t, and what I would have changed. Let’s get to it!
Soil method:
Materials needed: Nursery pot, soil, water, greenhouse/humidity dome
If you choose this method, you’ll want to ensure that you can create a humid environment for the nursery pots while constantly monitoring the environment. One thing you don’t want to do is rot the seed by providing such high humidity environments.
Steps:
Place soil in the bottom of nursery pot
Place seed on top of soil
Place more soil on top of seed
Water soil
Place into greenhouse/humidity dome
If you don’t have a greenhouse or a humidity dome, don’t fret! Use a larger ziplock bag to place over the nursery pot. This will create humidity for the plant. Be mindful and take the ziplock bag off periodically so that the plant can air out and breathe. I would suggest doing this every day if you can remember or every 2 days. Find out what works best for you, your plant, and the environment you created. When I tried this method, I saw no results which led me to the next method.
Ziplock Bag Method:
Materials needed: Ziplock bag, pen, paper towels
This method is probably one of the go to methods within the plant community for germinating a seed. It’s very easy and shows results rapidly.
Steps:
Dampen a paper towel
Place seed onto dampen paper towel
Place said paper towel (with seed wrapped) into the ziplock bag
Label the bag with the date
Place bag somewhere on your plant shelf.

Writing the date on the bag of when you start the process will help you monitor the growth rate and ensure how long it took to successfully root the seed. Although the seed is in a ziplock bag, I still made sure to let the bag air out and let the seed breathe every other day. Use your best judgment and do what works for you.
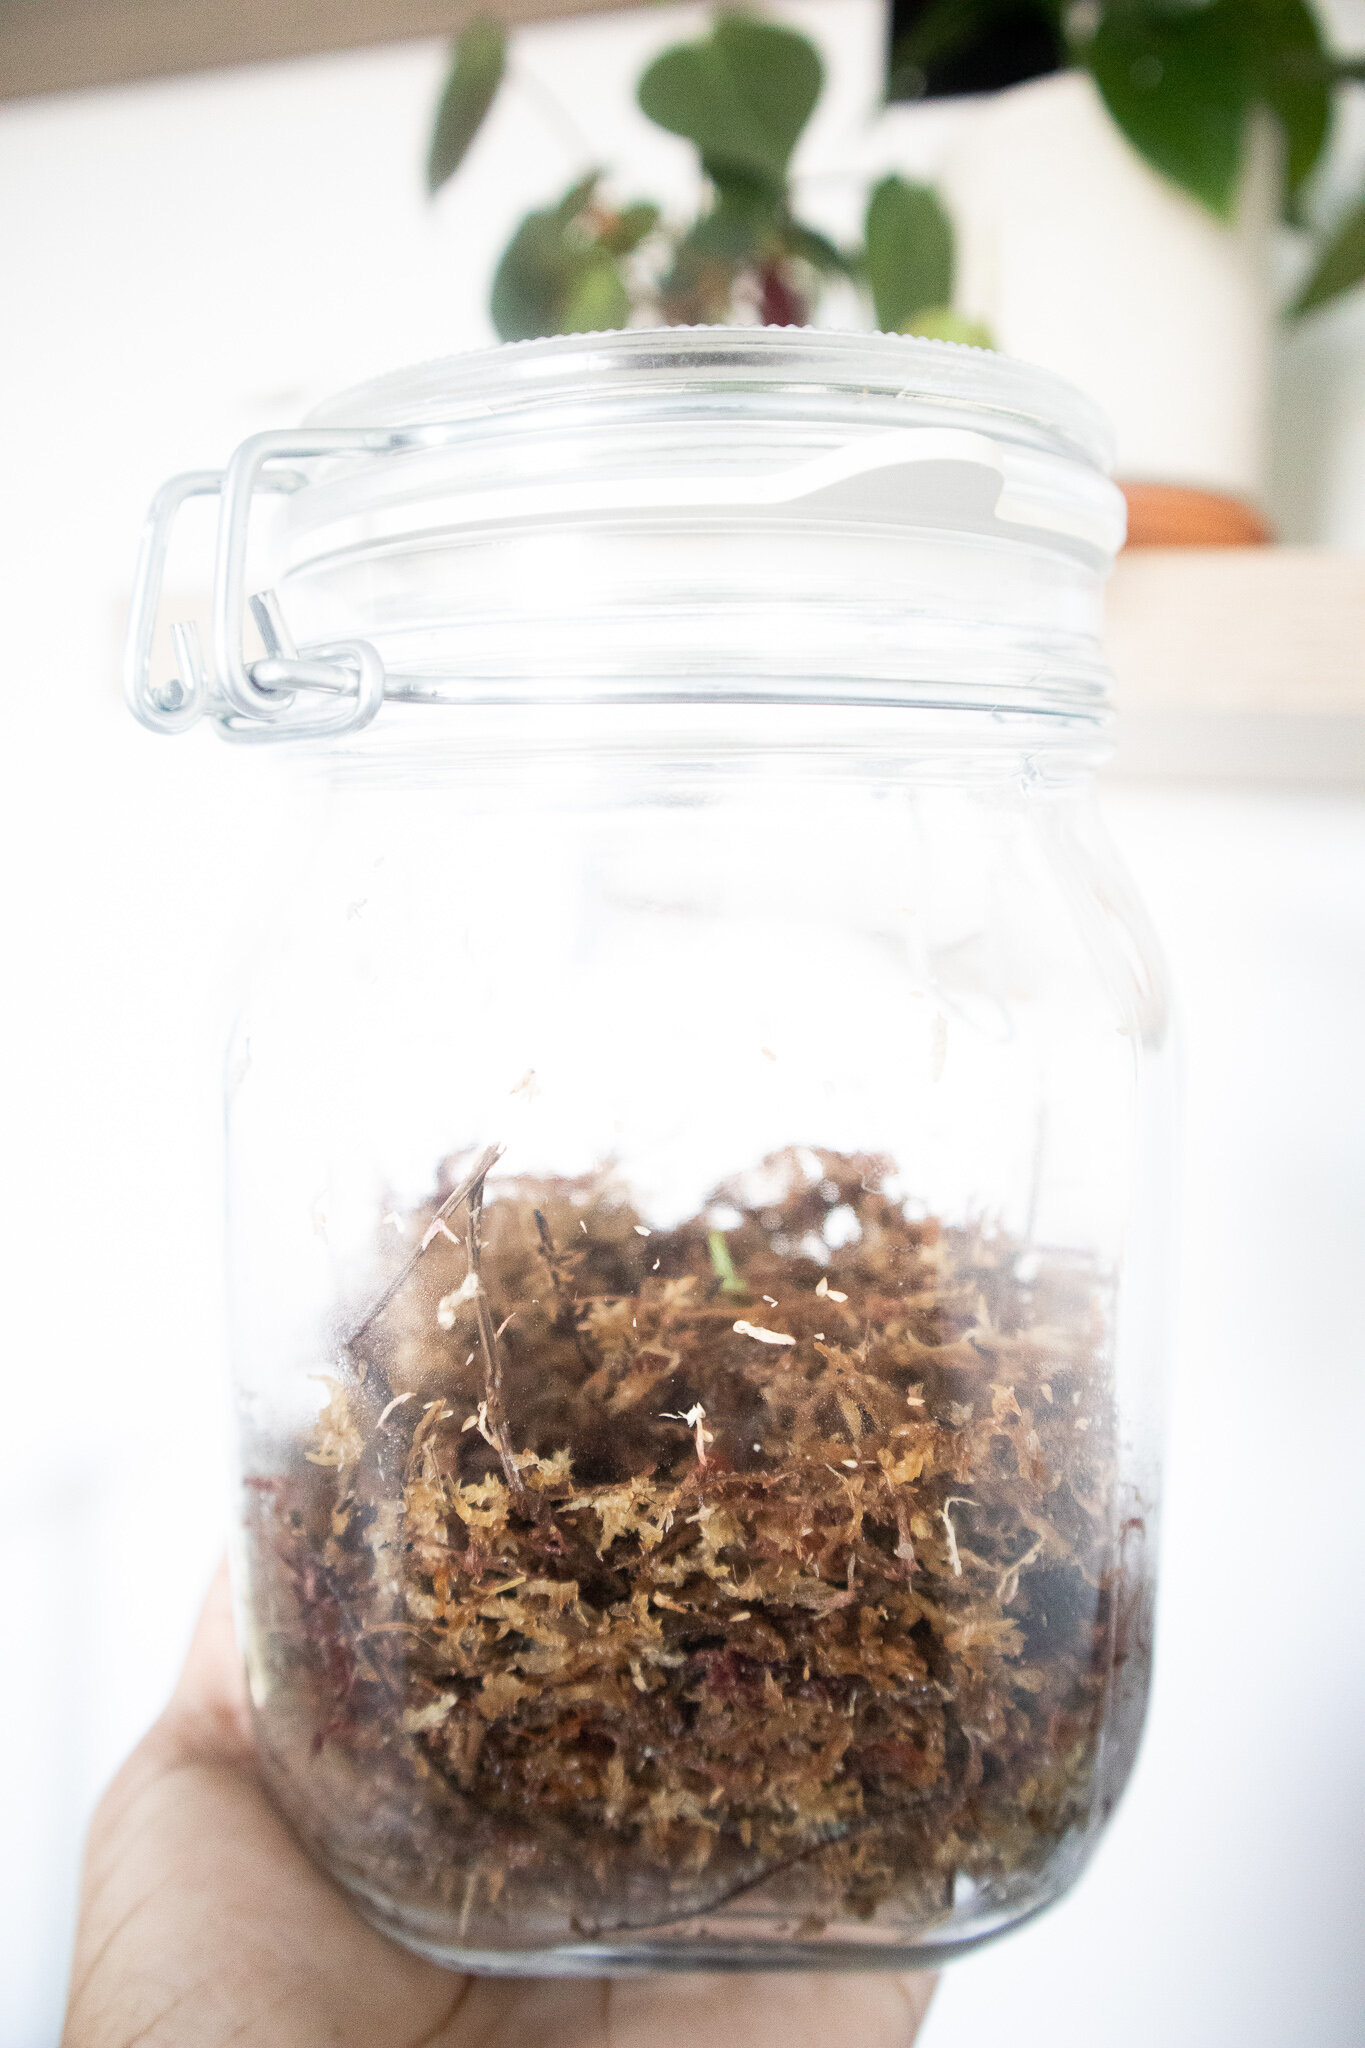
Sphagnum Moss Method:
Materials needed: Clear mason jar with a lid, moss, grow lights
Okay, this method is probably my favorite method because it was the one I was most excited about. I searched high and low to see if anyone blogged about this method and I found no luck. That left me very skeptical but I still wanted to try and man, did it work!
Steps:
Soak moss- I soaked my moss overnight to ensure it would retain enough water to get my seeds germinated.
Place moss loosely inside of the jar after squeezing excess water out of the moss
Place bulb on top of moss
Add more moss on top of seed, loosely
Close jar and place under a grow light. If you don’t have a grow light I would suggest placing somewhere that gets a lot of sunlight.
***Note that when using moss, you want to gently squeeze water out of it leaving it damp but not drenched***
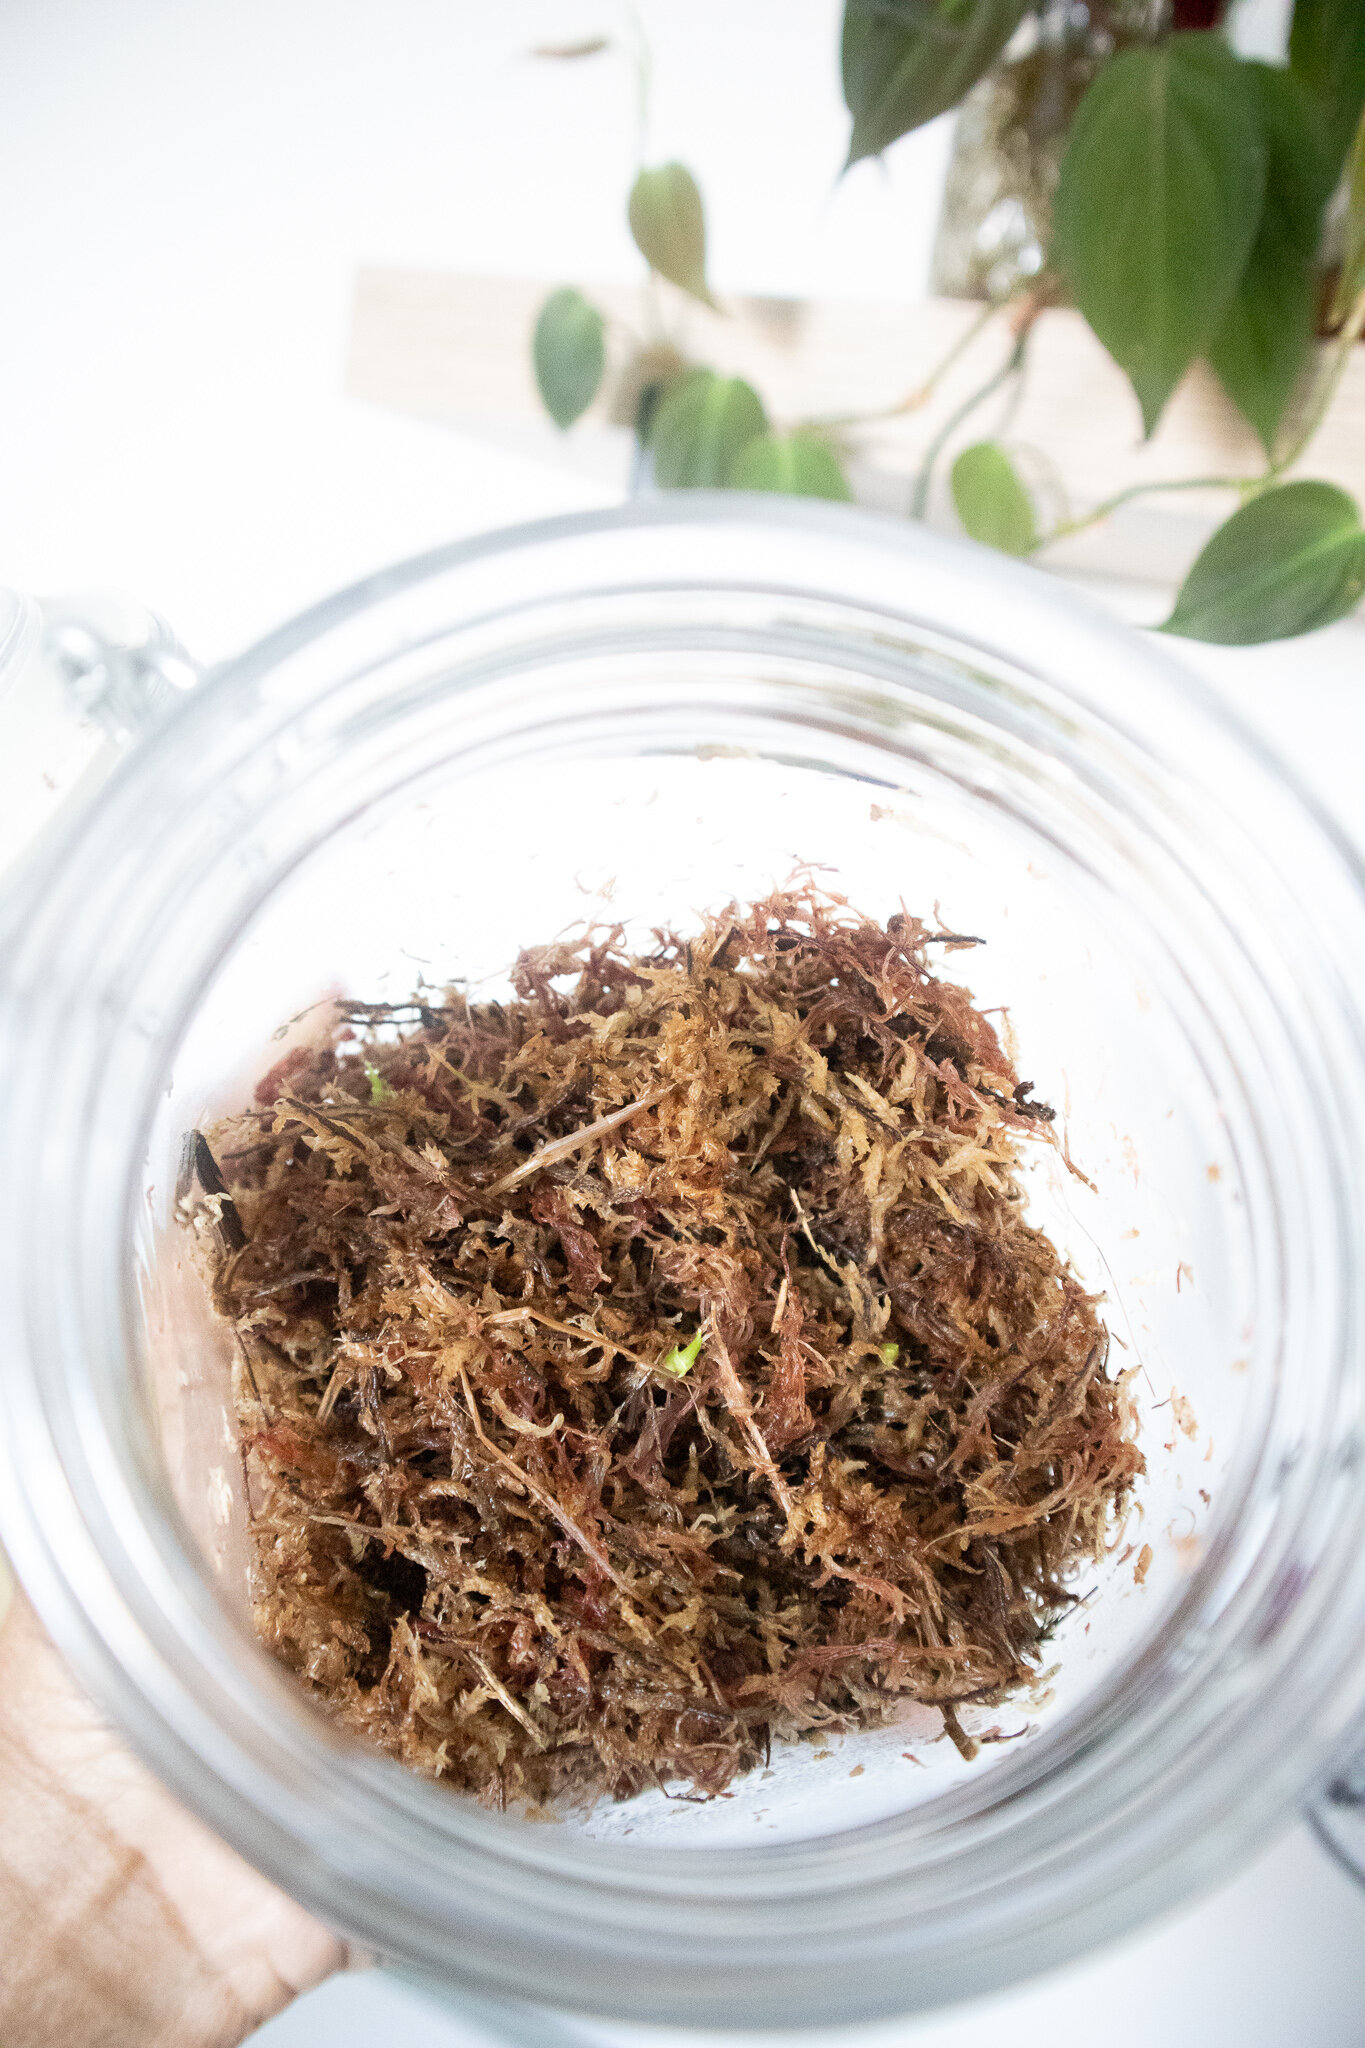
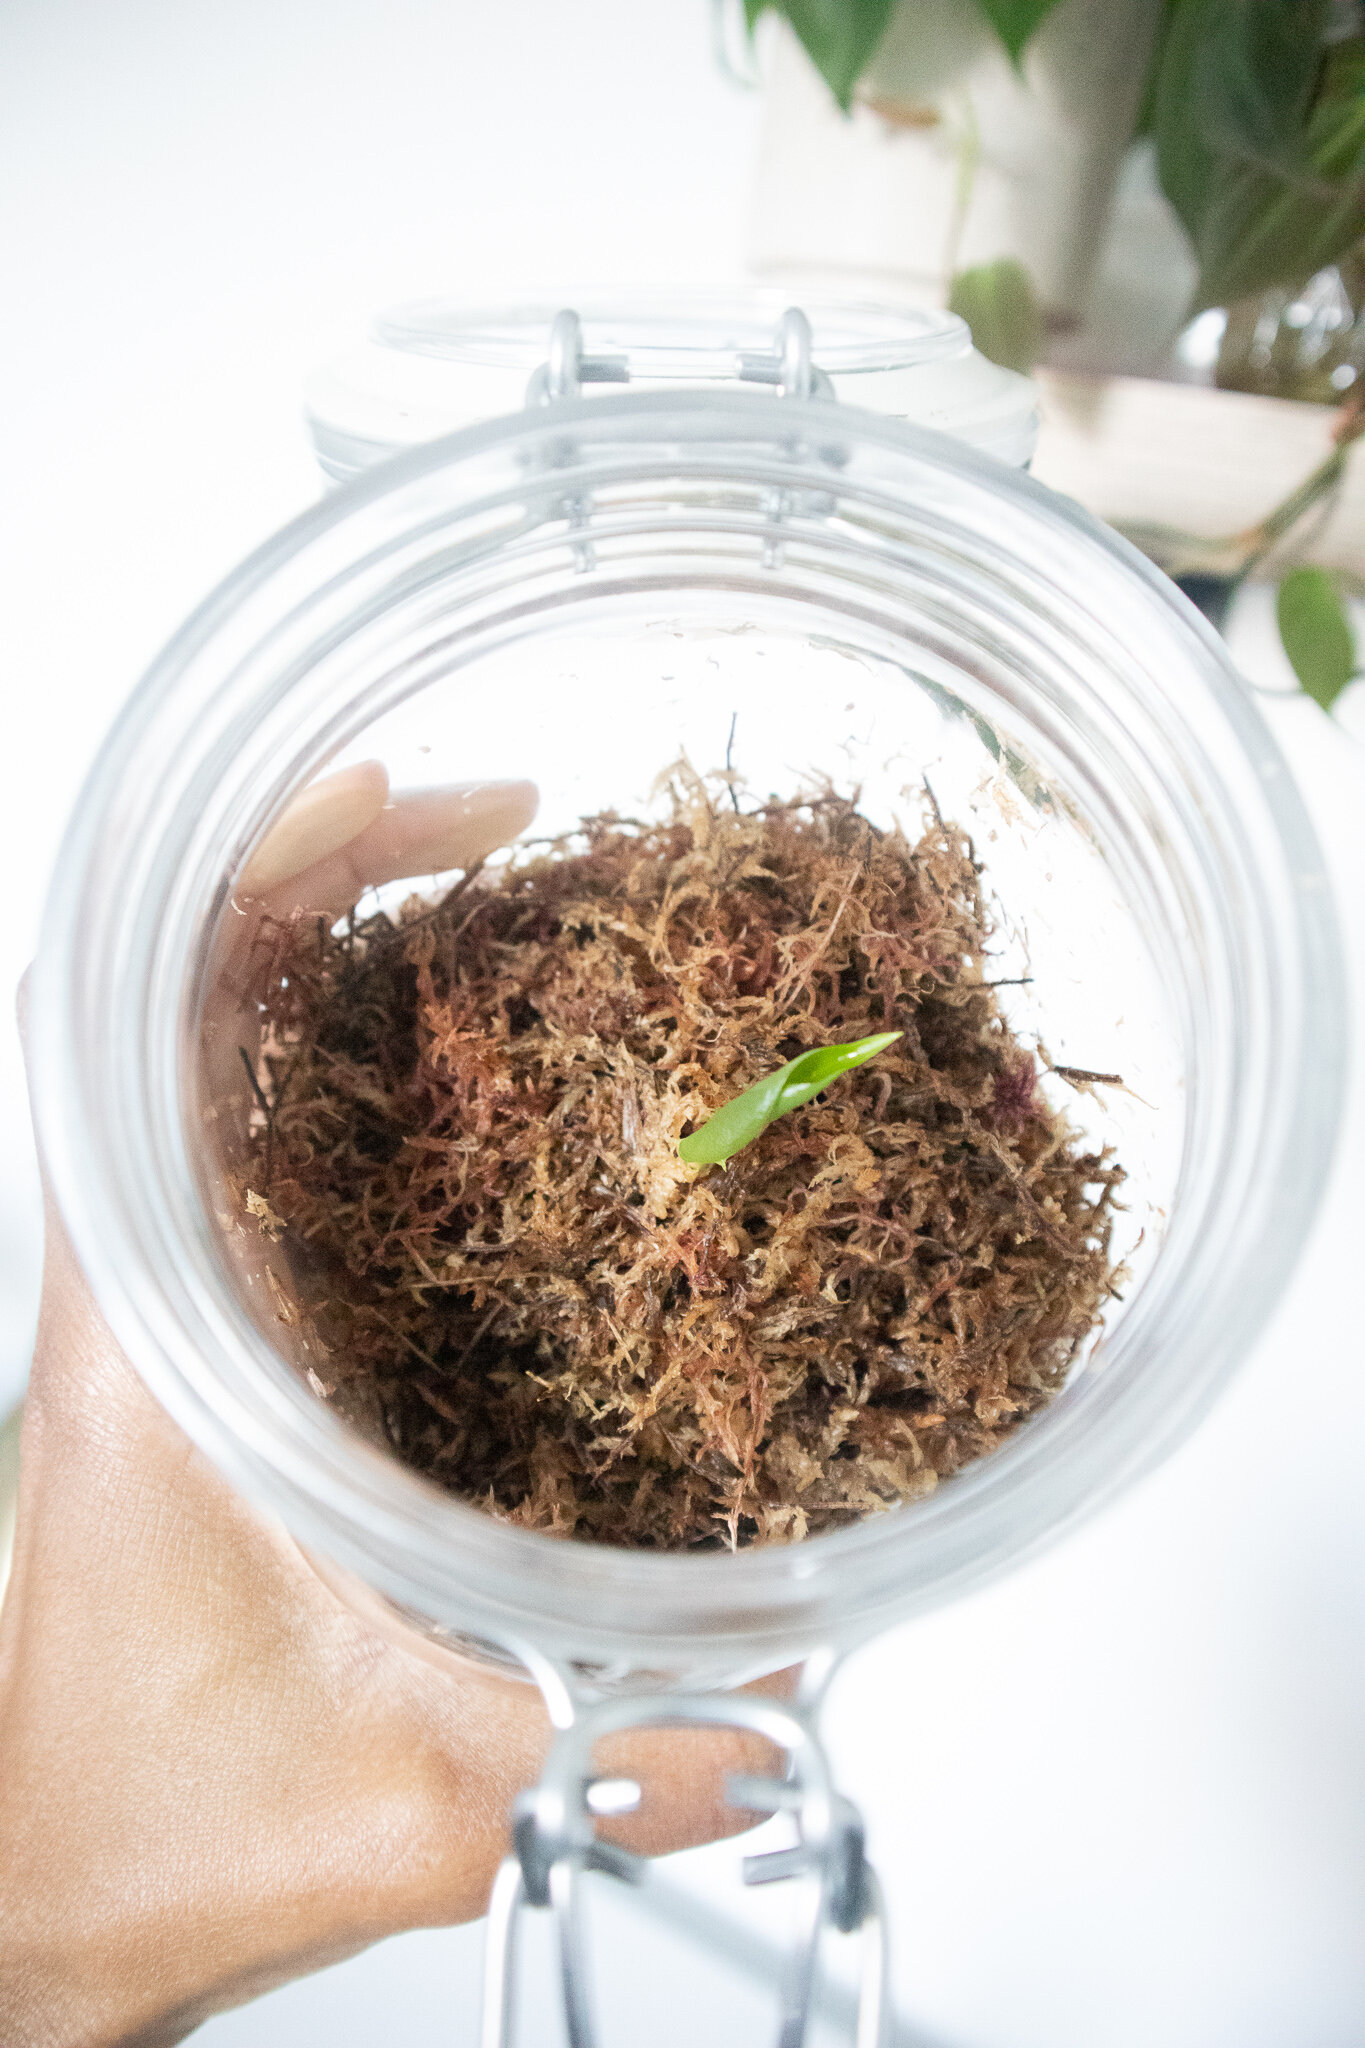
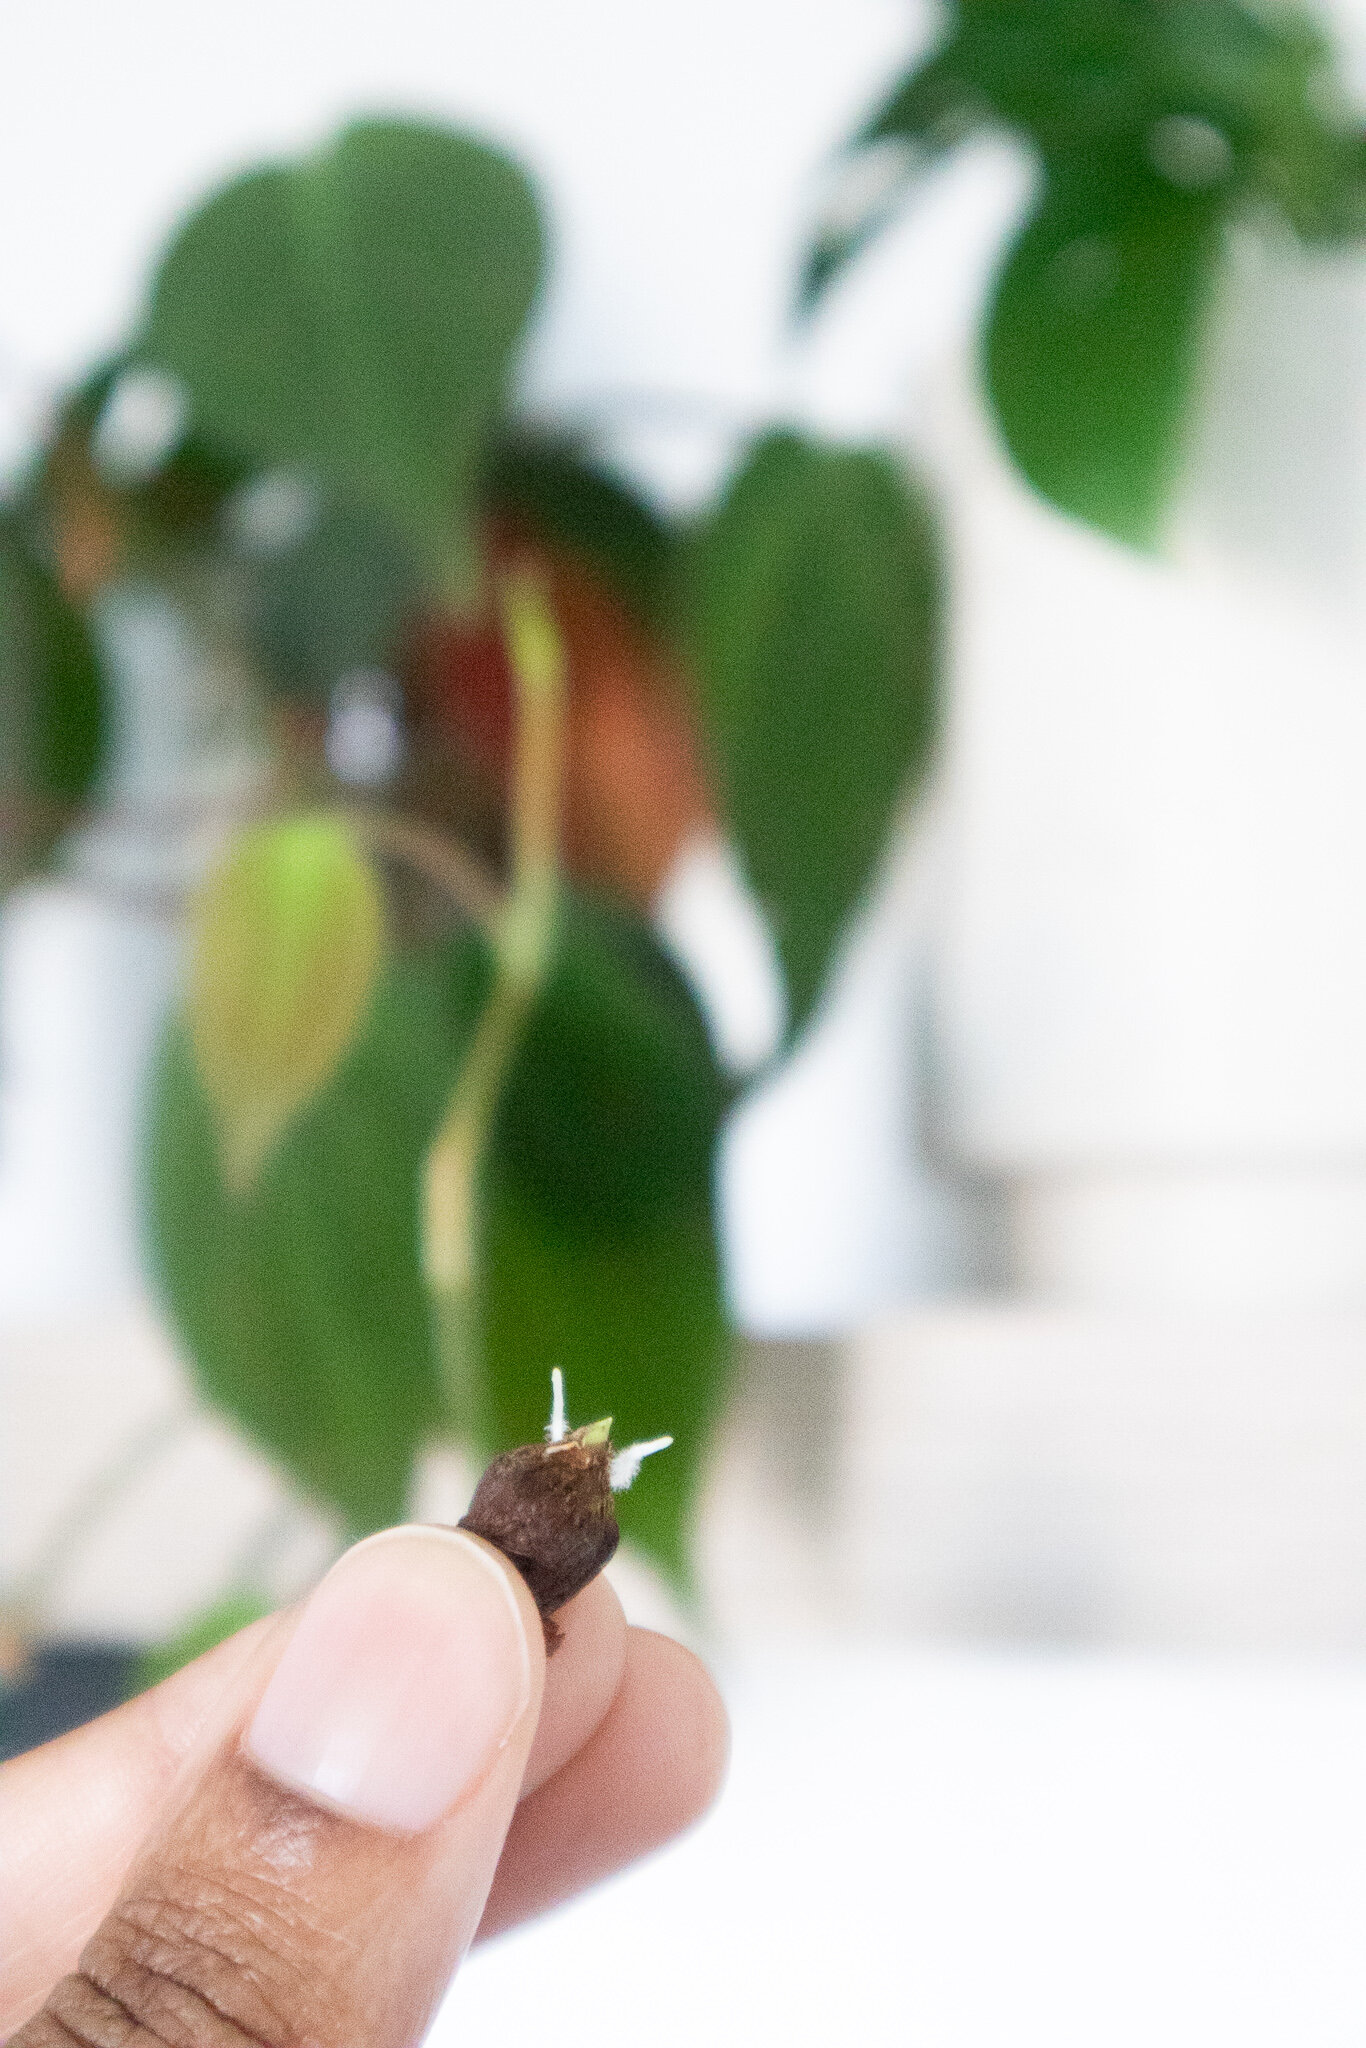
How will you know your bulbs are germinating? The seed will begin to open and roots will begin to form. If the roots are fuzzy as pictured below, it’s normal and you have nothing to worry about. Below I will show you the transformation of the bulbs.


Frequently asked questions from followers on Instagram:
How much time did it take for the bulbs to grow leaves?
It took about 17 days after starting the process to see my first leaf.
Recommendations on repotting from jar to pot?
This is definitely something that I believe is up to the grower. I think once the seed has fully developed and you see leaves, you’re fine to transfer to soil. Just be mindful of the medium you choose.
Estimated timeline?
I started my process on January 21, 2021 and the most recent pictures that you see were captured on March 10, 2021. So that’s about 48 days.
Is using a glass jar better or optional?
Using a glass mason jar was definitely optional. I waned to try this method as an experiment and ended up loving the turnaround and growth.
How often did you mist/water?
I misted the bulbs/plants every 2-3 days.
Where did you get the seeds from? I got the seeds from my older alocasia plant. Before getting rid of it due to spider mites, I went through the soil/roots to find its bulbs/corns.
Do alocasias go through a dormant season where their leaves die off? From personal experience, I’ve come to learn that my Alocasia Polly definitely goes through a dormant season. My other alocasias, have been growing steadily.
Where do you find the bulbs? are they in the soil?
Bulbs are located in the soil of the plant. You gently go through the roots/soil and if you’re lucky, you will come across a few bulbs.
Do temperatures matter?
Seeing as how I was able to control the temprateue (plastic bag/mason jar), I don’t think temperate matter that much. I wouldn’t have the seeds in a super cold room though. Now once the seeds begin to sprout, you will for sure want to make sure you’re keeping the environment at least at 60°-80°F (15.6°-26.7°C)
After the first leaf unfurls, when should you replant?
After the first leaf unfurls, it’s up to you when you should replant. I personally wouldn’t replant immediately, maybe 5-7 days after.
How important are humidity levels?
Humidity levels are VERY important when caring for an alocasia and growing seeds. If you cannot provide high humidity for the plant, I would advise waiting to grow until you have the proper resources/materials.
Do you have to expose them to dark/cool environment like other bulbs?
When my bulbs were in the ziplock bag, they were located behind my plants on a plant shelf. When I had them in mason jars, they were exposed to grow lights for about 8 hours a day.
Did you use any particular kind of moss? Did you add fertilizer to it?
I chose to use sphagnum moss and did not use any fertilizer.
I hope you enjoyed this blog post as much as I did! Please let me know if you have any other questions that I can answer for you in the comments below! I can’t wait to see the progress you make when you begin germinating your own alocasia seeds.
Until next blog post,
Brittanie